
This guide to hiking the Lost Coast Trail was created to help first-timers, seasoned backpackers, and curious explorers plan one of the most unforgettable coastal treks in the United States—from tide windows and gear lists to local tips from Shelter Cove House. However, no guide should be taken entirely on faith as addressing everything you need to make it enjoyable and memorable. Do please consider what will work best for you.
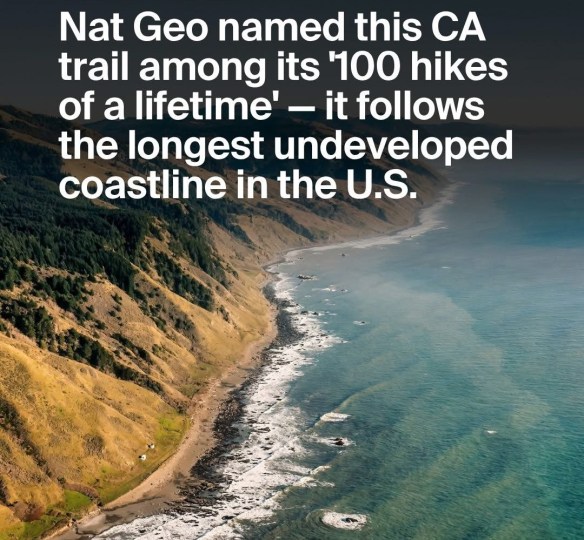
National Geographic named this 25-mile California trail among its ‘100 hikes of a lifetime‘. It follows the longest stretch of undeveloped coastline in the continental U.S.
“The Pacific Coast Highway is one of America’s most iconic drives—a ribbon of asphalt tracing California’s golden edge. But there’s a place where the road simply gives up. Where the mountains rise so dramatically from the ocean that engineers were forced to reroute the highway inland. What remains is the Lost Coast, a raw and remote stretch of shoreline where the landscape refuses to bend to development, and where hikers trade cell service for sea lions.”
Travel Leisure: This Remote U.S. Trail Has Black-sand Beaches, Elk Herds, and Is a Silent Haven With No Cell Service or Crowds
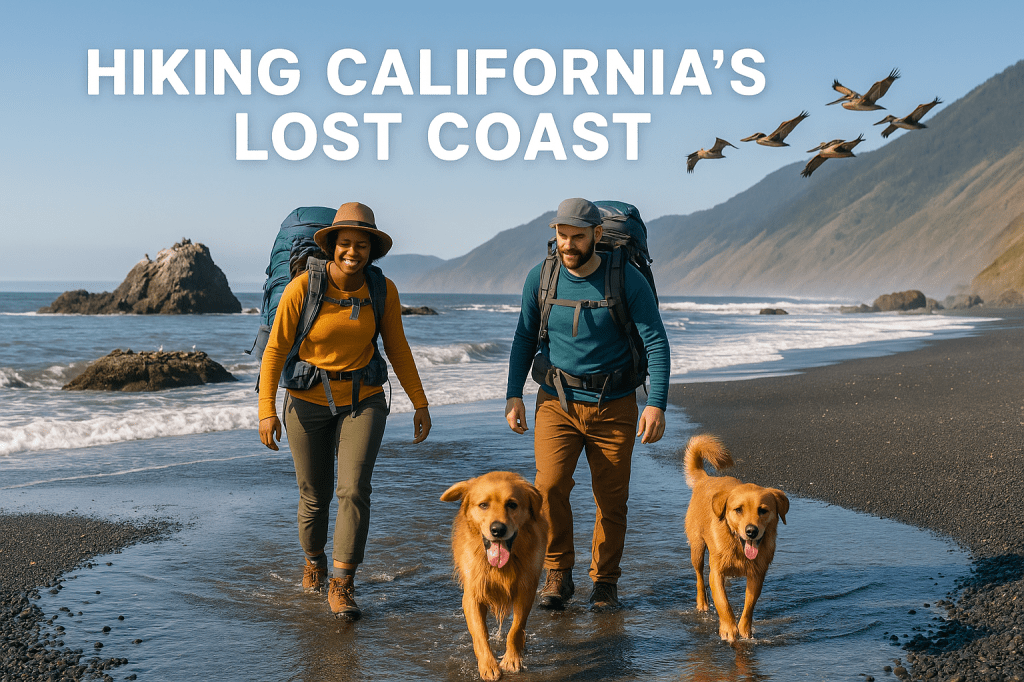
Come enjoy one of California’s best wilderness hikes. If having beauty all to yourself is your thing, this is the remote California coastal hike for you! Also known as one of the most remote California wilderness beach hikes, the Lost Coast Trail offers a rare, undeveloped stretch of Pacific Coast wilderness. Whether you’re planning a multi-day backpacking trip from Mattole to Shelter Cove, or researching the best California beach hikes, this guide is here to help you prepare for one of the most memorable off-the-grid adventures in the United States.

Here we strive to be a comprehensive resource for those looking to hike the Lost Coast Trail — one of the most remote, rugged, and rewarding coastal backpacking routes in the United States. This page brings together essential gear lists, tide safety guidance, planning tools, local insights, and trail section breakdowns to help you prepare with clarity and confidence. Download a brief PDF: Lost Coast Trail Essentials Summary
Why Hike the Lost Coast Trail?
The Lost Coast Trail isn’t just a backpacking route — it’s one of the last true coastal wildernesses in the continental United States.
Unlike most coastal hikes that follow developed roads or overlook bustling beaches, the Lost Coast plunges you into a landscape where the mountains meet the Pacific with no interruptions. There are no highways, no cell service, and often no other people in sight for miles. It’s wild in the truest sense — shaped by tides, wind, and the constant rhythm of the ocean.
Along its 25 rugged miles, you’ll walk on volcanic black sand, skirt beneath towering cliffs, watch harbor seals sun themselves on offshore rocks, and fall asleep to the crash of surf echoing across a treeless shoreline.
Backpacker & Blogger Perspectives

From She Dreams of Alpine on June 2019:
“This is not a trail for those seeking an average backpacking experience. The isolation and beauty of this trail are real.”
“The Lost Coast trail lies along one of California’s most beautiful rugged coastlines … It’s stunning, to put it mildly…”
From Lost Coast Adventures journaling the June 2019 trip:
“Northern California backpacking doesn’t get much better than a trip to the ocean where you can enjoy 26 miles of walking accompanied by sightings of elephant seals and otters.”
“The LCT … may be the most unusual trail that I have ever hiked. … the Ocean … can be a gentle giant or a raging beast.”
From a Beyond Ordinary Guides narrative:
“Mother nature is in charge. … The Lost Coast Trail is one of them.”
From r/norcalhiking:
“We loved it! Definitely worth the ~10 month wait between deciding we wanted to go and then actually being able to get a permit for an in-season date. … I especially would have loved to … take a partial day hike up Buck Creek Trail which quickly climbs to almost 3k feet.”
From an r/hiking “mildly terrifying” post:
“Most dangerous thing on the Lost Coast used to be illegal marijuana grow operations and the traps they’d set. … Nobody wanted to wake up on the beach with a bullet in their head…”
From eighth-grade students (“In Their Words…”):
“This trip was an incredible experience and is something I thought that I would never do.”
“The scenery was gorgeous. … the whole valley was covered in mist … it was beautiful!”
What makes hiking the Lost Coast Trail so unforgettable?
- Tide-timed navigation — parts of the trail are only passable at low tide, forcing you to plan like a mariner and hike with the rhythms of the sea.
- Tidepools, wildlife, and sea stacks — from starfish to sea lions, the coastline teems with life.
- Milky Way skies — on clear nights, the stars reach down to the horizon, completely untouched by light pollution.
- Real solitude — there are no roads, no shops, no trailhead crowds. Just the trail, the tide, and the wild.
- A Truly Wild Kingdom – The wildlife on the Lost Coast is abundant and untamed. You’ll certainly see the resident sea lions, but keep your eyes peeled for much more. Hikers frequently spot deer on the bluffs, turkey vultures circling overhead, and even fresh black bear tracks in the sand. The presence of both living and deceased animals is a powerful reminder that you are a visitor in a wild and functioning ecosystem.
It’s physically demanding — the sand saps your energy, the cliffs rise steep, and the terrain demands focus. But it’s also spiritually clarifying. The Lost Coast Trail invites you to disconnect from everything but the essentials: movement, breath, and the path ahead.
If you’re looking for the kind of trail that gives you stories, silence, and stargazing — this is it.
Quick Navigation within this guide / Table of Contents (TOC)
- Overview of the Trail
- Typical Itineraries: Choose Your Pace
- Permits and Regulations
- Tide and Weather Safety
- North-to-South vs. South-to-North
- Lost Coast Gear List & Checklist
- Gear Comparison Matrix (Ultralight vs. Comfort)
- Where to Shop for Gear
- Local Transportation and Shuttles
- Official & Planning Resources including Maps, GPX Files, and Trail Resources
- The Living Coast: A Guide to Wildlife Encounters & Ecosystems
- Things to Bring If You’re Taking a Dog
- Essential Local Knowledge: Water Sources and Trail Ethics
- Critical Safety: Emergency Preparedness
- Shelter Cove as a Base Camp
Local trails around Shelter Cove - When to Go: Choosing Your Season on the Lost Coast
- Frequently Asked Questions (FAQs)
- 12 Other Guides (“The Dirty Dozen”)
- Some of the Videos on Hiking the Lost Coast Trail
Overview of the Trail

The Lost Coast Trail is a 25.3-mile stretch of undeveloped coastline — often considered the most iconic wilderness coastal trail in California, popular among those seeking a bucket-list backpacking route or a Pacific beach hike without crowds.. It runs between the Mattole River Trailhead in the north and Black Sands Beach in Shelter Cove to the south — passing through towering cliffs, black sand, shifting tides, and a coastline so rugged that Highway 1 was diverted inland to avoid it.
Key Trail Sections
| Section | Distance | Description |
| Mattole to Punta Gorda Lighthouse | ~3 miles | Sandy beach, scattered driftwood, and first views of sea lions |
| Punta Gorda to Sea Lion Gulch | ~5 miles | Rocky tidal zones and cliffs; first tide-dependent zone |
| Sea Lion Gulch to Spanish Flat | ~4 miles | Open beach walking, dunes, and camping options inland |
| Spanish Flat to Big Flat | ~7 miles | Popular camp area with grass terraces and a seasonal creek |
| Big Flat to Black Sands Beach Trailhead | ~6.5 miles | Most difficult terrain: steep, rocky, and tide-timed sections |
Go Back to the Table of Contents Links Page.
Lost Coast Trail Itineraries (2–4 Day Options): Choose Your Pace
The Lost Coast Trail can be completed in 2, 3, or 4 days depending on your fitness and desired pace. Below are the most common itineraries. Remember to align your daily mileage with the low tide windows for the impassable zones.
A Note on “Beach Miles”: Adjusting Your Pace
A mile on the Lost Coast is not like a mile on a normal trail. Walking on soft sand and navigating fields of shifting, baseball-sized rocks requires significantly more energy and time.A good rule of thumb is to expect to hike at about 50% of your normal backpacking pace. If you typically average 2.5 mph on a forest trail, plan for an average of 1-1.5 mph on the Lost Coast. This conservative estimate will help you build a realistic itinerary and ensure you have plenty of buffer time to meet your low-tide windows.
3-Day Itinerary (Most Common)
This is the most popular option, offering a challenging but rewarding pace that balances daily mileage with time to enjoy the scenery. For most hikers, the 3-day itinerary strikes the perfect balance. It’s challenging enough to feel like a significant accomplishment but allows enough time to relax at camp, explore the tide pools, and truly soak in the wild beauty of the coast without feeling rushed.
- Day 1: Mattole Trailhead to Spanish Flat (~12 miles)
- Day 2: Spanish Flat to Big Flat (~7 miles)
- Day 3: Big Flat to Black Sands Beach Trailhead (~6.5 miles, requires tide-timing)
4-Day Option (More Leisurely)
This itinerary breaks up the long first day of the 3-day plan, allowing for a more relaxed pace, shorter hiking days, and more time for camp relaxation and tide pool exploration.
- Day 1: Mattole Trailhead to Sea Lion Gulch (~8 miles)
- Day 2: Sea Lion Gulch to Spanish Flat (~4 miles)
- Day 3: Spanish Flat to Big Flat (~7 miles)
Fastpack / 2-Day Itinerary (Advanced)
This aggressive plan is only for experienced, fast-moving backpackers with lightweight gear who are confident in their ability to cover long distances on difficult terrain.
- Day 1: Mattole Trailhead to Big Flat (~19 miles)
- Day 2: Big Flat to Black Sands Beach Trailhead (~6.5 miles)
How to Think About the Trail: A 4-Mile Mental Map
The best way to track your progress and stay motivated is to think of the trail not as one 25-mile slog, but as a series of roughly 4-mile sections:
– Section 1: Mattole Trailhead to the Punta Gorda Lighthouse (~4 miles)
– Section 2: Lighthouse past the first impassable zone (~4 miles)
– Section 3 & 4: The long, open stretch of the “flats” (~8 miles total)
– Section 5: The second major impassable zone at the end of the flats (~4 miles)
– Section 6: The final push to Black Sands Beach (~4 miles)
By breaking the journey into these smaller, more manageable chunks, you’ll have a much better sense of your location and pace.
Go Back to the Table of Contents Links Page.
Lost Coast Trail Permits & Wilderness Rules
- Permits are required for overnight trips. Get them through Recreation.gov.
- Group size limit: 5–10 (check seasonal restrictions)
- Bear canisters: Required year-round
- Campfires: Not allowed; use backpacking stoves
This area is part of the King Range Wilderness in Humboldt County, which protects this unique meeting of mountain and sea. It’s considered one of the most untouched hiking trails in Northern California.
Major Creeks and Campsites
While there are many seasonal streams, several named creeks serve as reliable landmarks and water sources year-round. Key spots you’ll encounter include:
- Sea Lion Gulch: An early landmark and potential campsite, though be prepared for the noisy sea lion colony that gives the area its name.
- Cooskie Creek: A notable campsite located between the first and second tidal zones. It serves as a good strategic resting point.
- Spanish Creek & Big Flat: These are the largest and most popular camping areas. Big Flat, in particular, is a unique spot known for its grassy meadow, a private airstrip, and whale-bone art installations left by local surfers. It’s a welcome reprieve from the rocky trail.
- Gitchell Creek: The last major water source before the final, challenging push to Black Sands Beach. Be sure to fill up here.
Tidal Considerations

At least 3 major tide-locked zones (also known as The Impassible Zones) must be passed at low tide:
- Punta Gorda to Sea Lion Gulch
- Miller Flat to Big Flat
- Gitchell Creek to Black Sands Trailhead
You’ll need 2–3 hours of hiking time within each low tide window to safely pass.
Go Back to the Table of Contents Links Page.
Lost Coast Tide Safety Tips & Weather Guide
The Lost Coast Trail is uniquely shaped by the Pacific Ocean — large portions of it are literally cut off at high tide. This isn’t a trail where you can “push through” and keep going; mistiming the tides can be dangerous or fatal. Here are some Lost Coast tide safety tips:
Tide-Locked Zones
There are three critical tide zones that become impassable:
- Punta Gorda to Sea Lion Gulch (miles 3–8)
- Miller Flat to Big Flat (miles 17–19)
- Gitchell Creek to Black Sands Trailhead (miles 23–25.3)
Each requires low tide crossings, with hikers needing to pass within 2 hours of peak low tide — ideally starting the segment 30–60 minutes before low tide.
Tide Planning Tips
- Use the official NOAA Tides – Shelter Cove chart for the Shelter Cove tidal station.
- Account for hike time, not just crossing time — rocky sections may slow you more than expected.
- Print a tide chart or screenshot it to your phone; annotate it for each day’s hike.
- Add buffer time (at least 1 extra hour of margin) if you’re unsure of your pace.
- Impassable doesn’t just mean wet — it can mean cliffs against crashing waves with no bailout options.
“Many rescue calls on the Lost Coast involve hikers caught by rising tides. Plan conservatively. Backtrack if needed.” Note also that cell phone coverage is spotty at best. If you can’t call 911, don’t forget you can also text them your issue and location.
A Veteran’s Rule of Thumb for Tides
While you must carry and understand your tide chart, many experienced Lost Coast hikers simplify their daily plan with this rule: Stay out of the impassable zones for the 4 hours surrounding high tide.
This means you should aim to be at a safe spot (like a campsite or a wide-open beach) 2 hours before the day’s high tide, and don’t re-enter the zone until 2 hours after the high tide has passed. For the majority of the day, the trail is perfectly navigable. This simple rule prevents you from getting trapped and removes much of the anxiety around tide timing.
Weather Warnings
- Fog is common year-round, especially in the mornings.
- Wind can be intense — expect constant northwest winds of 10–30 mph.
- Rain and creek crossings are major concerns from November to April.
- Sun exposure is constant on beach stretches — no shade, so pack sun protection.
Real-time forecasts: NOAA Shelter Cove Weather
Which Direction to Hike: North-to-South vs. South-to-North
The direction you choose to hike the Lost Coast Trail significantly shapes your logistical planning and overall experience. While both routes cover the same beautiful terrain, most hikers opt to travel from North to South for several compelling reasons.
North to South (Mattole to Shelter Cove): The Classic Route
Hiking north to south is the most popular choice. This route has you starting at the remote Mattole River Trailhead and finishing at Black Sands Beach in Shelter Cove.
Most hikers go north to south (Mattole to Shelter Cove), with the sun and wind at your back. But some prefer south to north for shuttle timing or personal pacing.
| Direction | Pros | Cons |
| North to South | More popular, sun at your back | Shuttle required to start |
| South to North | End at remote Mattole (quieter end) | Facing wind and sun |
Lost Coast: The Essentials At a Glance
- Best Months: May–October
- Fires: Prohibited — bring stove
- Cell Signal: None — bring offline GPX
- Tide Traps: 3 major zones — plan conservatively
- Map: Download BLM Map
- Permit Required: Recreation.gov
Go Back to the Table of Contents Links Page.
Lost Coast Gear List & Checklists

These checklists cover start with the minimum gear required to safely hike the Lost Coast Trail. Your choices may vary based on conditions, season, and personal preferences and there are optional items also listed below. However, the “Core Gear” items are non-negotiable for safety and comfort. Nonetheless, each individual should check and think through what is needed to make the trek complete and enjoyable for them. Download: PDF Version of Checklist for hikers of California’s Lost Coast Trail
Core Gear
- Permit printout – Rangers occasionally check for permits. Keep it dry in a ziplock or laminated sleeve.
- Bear canister – Required by BLM. Soft-sided bear bags or hanging techniques are not allowed. Garcia and BearVault are most commonly used.
- Tent or bivvy – Shelter must be durable enough to withstand strong coastal winds. Freestanding tents are recommended as stakes may not hold in sandy or rocky areas.
- Sleeping bag – Overnight lows can dip below freezing even in summer. Choose a sleeping bag rated to at least 30°F, with a compression sack.
- Sleeping pad – Provides insulation from the cold ground and additional comfort on sand or gravel. Inflatable pads are lighter; foam pads are more durable.
- Pro-Tips for the Experienced Minimalist For ultralight backpackers or those with extensive experience, it’s possible to approach the Lost Coast with a different gear strategy.
– Shelter: In good weather, some experienced hikers opt for just a bug bivy and a tarp instead of a full tent. This saves significant weight but requires careful site selection and a high tolerance for morning condensation from the coastal fog.
– Gaiters: While essential for keeping sand out, heavy-duty “snow gaiters” are often overkill. A pair of lightweight, low-profile trail gaiters is all you need to keep your shoes free of debris without adding unnecessary weight and heat.
– Footwear for Crossings: During the rainy season (November-April), creek crossings can be high and fast. Be prepared to cross in your primary hiking shoes, as attempting to change footwear on slippery, rocky banks can be dangerous. Your feet will get wet—focus on having dry socks to change into at camp.
Footwear & Clothing
- Waterproof boots or trail runners – Both are common choices. Trail runners dry quickly and are more comfortable on sand, while waterproof boots offer better protection in rocky, wet sections. Expect wet feet either way — carry extra socks.
- Camp shoes or sandals – Vital for river crossings, camp comfort, and giving your feet a break. Lightweight options like Crocs or Tevas are great. Some hikers wear these barefoot to dry out socks.
- Wool or synthetic socks (2–3 pairs) – Avoid cotton. Wool blends help prevent blisters and stay warm even when wet. Change daily or as needed to keep your feet healthy.
- Rain jacket – Choose a lightweight, breathable shell — not just a poncho. Coastal fog and surprise rain showers are common, even in summer.
- Insulation layer – Evenings and mornings can dip into the 30s or 40s°F. Bring a compact fleece or down jacket for layering at camp.
- Sun protection – The trail offers little to no shade. A wide-brimmed hat, polarized sunglasses, and reef-safe sunscreen are essential.
Packing & Navigation
- Backpack (40–65L) – Choose a pack large enough to carry food for up to 4 days, a bear canister, and gear. A padded hip belt is essential for comfort over uneven terrain. Frameless ultralight packs are not recommended unless you’re an experienced minimalist.
- Dry bags or trash compactor bags – Rain, sea spray, and river crossings make waterproofing crucial. Line your main pack with a trash compactor bag, and use dry bags for clothes, sleeping gear, and electronics.
- Trekking poles – Optional but highly recommended. Poles provide stability on rocky beaches, help with balance during creek crossings, and reduce strain on knees during long days on uneven surfaces.
- Map and compass – Even if you’re using GPS, bring a paper map and compass as backup. Coastal fog and battery failures can disable digital tools when you need them most.
- Printed tide chart – Critical for safe passage through tide-locked zones. Mark your planned crossings and keep it in an accessible place (e.g., zippered pouch or shirt pocket).
Food & Water
- Backpacking stove + fuel – Campfires are not permitted on the Lost Coast Trail, so a lightweight backpacking stove is essential. Canister stoves like the Jetboil or MSR PocketRocket are popular options. Make sure your fuel canister is full before heading out — there’s nowhere to buy more locally.
- Cook pot and utensils – A small pot with a lid doubles for boiling water and cooking meals. Bring a long-handled spoon or spork, and a small towel or cloth for cleanup.
- Cold soak jar (optional) – For ultralight hikers or fire restrictions, a screw-top container (like a Talenti jar) can be used to rehydrate meals without heat. Works well for oatmeal, couscous, or dehydrated meals.
- Water filter or tablets – There are several stream and creek crossings on the trail, but all water should be filtered or treated. Options include squeeze filters (Sawyer), pump filters, or chemical treatments (Aquamira drops or chlorine dioxide tablets).
- 2–4L water capacity – Some trail sections (especially Big Flat to Black Sands) may be dry. Carry at least 2L at all times, with the ability to hold 3–4L for longer stretches. Soft flasks or collapsible bladders save weight.
- Food for full duration – Bring calorie-dense meals and snacks for 2–4 days depending on your itinerary. Pack all food in a bear canister — no exceptions. Pre-packed dehydrated meals, nut butters, bars, and trail mix are reliable staples.
Many hikers search for the best Lost Coast Trail gear list, but what you really need is a smart strategy for managing tide timing, sand fatigue, and exposure. This isn’t just a California coastal hike — it’s a full-body wilderness experience where every ounce matters.
Safety & Comfort
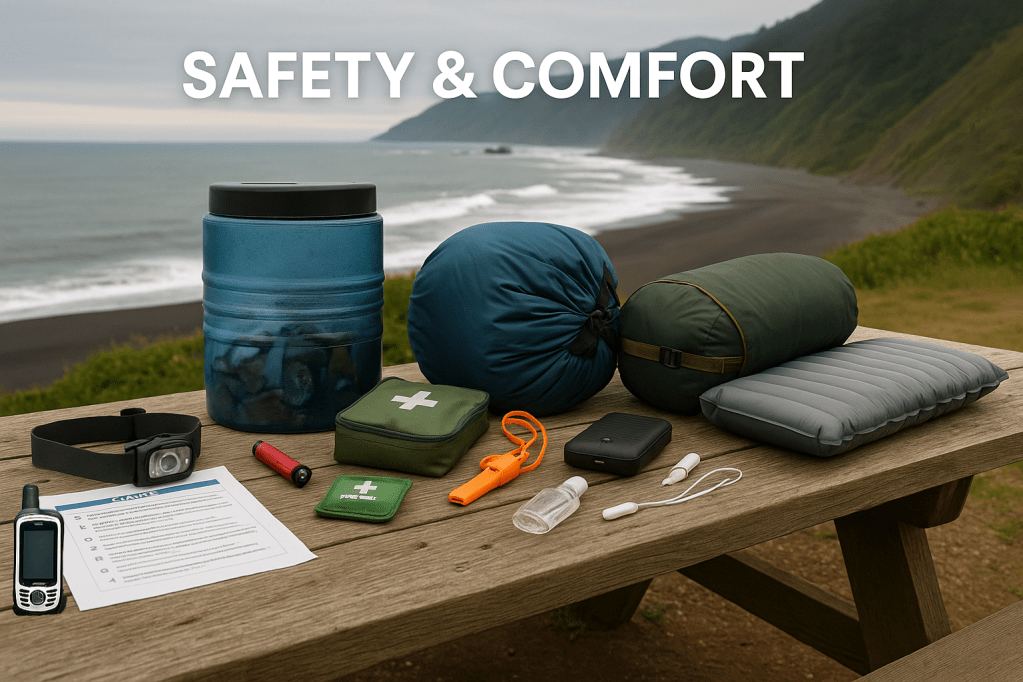
- Headlamp – Essential for early morning starts or late arrivals at camp. Bring extra batteries or use a rechargeable model with a power bank. Red-light mode preserves night vision.
- First aid kit – Customize it for blisters, cuts, and pain management. Include leukotape or moleskin, antibiotic ointment, ibuprofen, antihistamines, and any personal medications.
- Repair kit – Small and critical. Include tenacious tape, zip ties, duct tape strips, a sewing needle, and safety pins. Useful for gear failures or clothing damage.
- Toiletries – Toothbrush, toothpaste, hand sanitizer, and a WAG bag or trowel. All waste must be packed out or buried properly (at least 6–8 inches deep and 200 feet from water).
- Navigation app with GPX – Download offline maps via Gaia GPS, Caltopo, or AllTrails. Keep your phone in airplane mode to conserve battery. GPX files help track location in fog or unfamiliar areas. See also Official & Planning Resources including Maps, GPX Files, and Trail Resources below.
- Battery pack – A 5,000 to 10,000 mAh pack can keep your phone and headlamp charged over several days. Consider solar chargers only if you’re hiking longer stretches and have full sun exposure.
- Whistle and signal mirror – Compact and lightweight emergency tools. A whistle carries farther than your voice; a mirror can signal to search and rescue teams if needed.
- Permit printout – Rangers occasionally check for permits. Keep it dry in a ziplock or laminated sleeve.
- Bear canister – Required by BLM. Soft-sided bear bags or hanging techniques are not allowed. Garcia and BearVault are most commonly used.
- Tent or bivvy – Shelter must be durable enough to withstand strong coastal winds. Freestanding tents are recommended as stakes may not hold in sandy or rocky areas.
- Sleeping bag – Overnight lows can dip below freezing even in summer. Choose a sleeping bag rated to at least 30°F, with a compression sack.
- Sleeping pad – Provides insulation from the cold ground and additional comfort on sand or gravel. Inflatable pads are lighter; foam pads are more durable.
Go Back to the Table of Contents Links Page.
Critical Safety: Emergency Preparedness
The Lost Coast is a remote wilderness where you must be prepared for total self-reliance. There is no reliable cell service, and rescue operations can be complex and delayed by weather or tides.
Your safety plan should include multiple ways to signal for help.
- Satellite Messenger or PLB (Highest Reliability): For those who want to be extra safe, consider carrying a satellite communication device like a Garmin inReach or a Personal Locator Beacon (PLB). These devices work without cell coverage to send an SOS signal to emergency services. Many models also allow for two-way text messaging. If you don’t want to purchase one, these can often be rented from outdoor retailers like REI for the duration of your trip.
- Cell Phone (Limited Reliability): While you should never count on it, your phone may still be a lifeline.
- If you have a weak signal but cannot make a voice call, you may be able to text 911. Open your messaging app, enter “911” in the recipient field, and send a brief message with your location and emergency.
- Carry a fully charged phone and a battery pack to keep it powered.
- Bail-Out Trails: Your Emergency Exits
If you encounter impassable conditions due to a storm, injury, or other emergency, there are several primitive, unofficial “bail-out” trails that lead from the coast up into the hills of the King Range. These are not easy escape routes—they are steep, rugged, and unmaintained—but they are your access to safety if needed.
– Know Their Location: Note the general locations of these trails on your map before you begin your hike. They are often found near major creeks.
– For Emergency Use Only: These trails should only be used in a genuine emergency. They will lead you away from the coast and toward inland roads, but require significant effort to climb.
– Satellite Device is Key: If you need to use a bail-out trail, it is critical to have a satellite messenger to communicate your new location and plan to emergency services or your shuttle contact.
Gear Comparison Matrix (Ultralight vs. Comfort-Focused)
| Category | Ultralight Hiker (MSRP Range) | Comfort-Focused Hiker (MSRP Range) |
| Pack Weight Goal | Sub-25 lbs base weight (often under 15 lbs) | Base weight 30–40 lbs |
| Shelter | Tarp + bivvy sack or single-wall ultralight tent $150–$400 | Freestanding tent for ease, wind protection, and interior space $200–$500 |
| Sleep System | Down quilt + foam pad; minimum insulation $180–$400 | Full sleeping bag + inflatable pad for warmth and comfort $250–$500 |
| Footwear | Trail runners (dry quickly, lightweight, less support) $90–$160 | Waterproof boots for ankle support and protection on wet rocks $130–$220 |
| Clothing Strategy | Merino base layers, wind shell, minimal insulation $150–$300 | Redundant layers, puffy jacket, dedicated camp clothes $250–$450 |
| Cooking Setup | Cold soak jar, tiny stove (e.g. Esbit, alcohol, or Jetboil MicroMo) $30–$100 | Full canister stove (e.g. MSR PocketRocket) with cook pot, mug, utensils $100–$250 |
| Water System | 1–2L capacity; Sawyer Squeeze or tablets $20–$60 | 3–4L capacity; filter + gravity setup or backup treatment system $50–$120 |
| Food Planning | High-calorie, low-weight meals (cold-soak or one-pot) $8–$12 per meal | Cooked breakfasts/dinners, coffee kit, fresh snacks $10–$20 per meal |
| Navigation | Phone with offline GPX, small backup compass $0–$150 | Printed topo maps, compass, and digital backups (e.g. phone + watch) $50–$400 |
| Luxury Items | None or minimal: maybe a paperback book or ultralight pillow. Or, just take an empty pillow case and stuff clothing in it at night. $0–$40 | Camp chair, full-size pillow, journal, tripod, backup charger $40–$200 |
| First Aid & Repair | Compact kit with only essentials $20–$50 | Full kit: meds, wrap, multitool, duct tape, needle & thread $50–$120 |
| Hiking Pace | 10–20 miles per day with light loads | 6–12 miles per day with long rests and scenic detours |
| Resupply Dependence | Minimal (carry all supplies) | Prepared to carry extras or cache for comfort and variety |
Go Back to the Table of Contents Links Page.
Where to Shop for Gear
- Outdoor Vitals – A solid mix of performance and affordability; good entry-level ultralight gear with strong YouTube presence and education.
- REI Co-op – Trusted outdoor chain with expert staff, a generous return policy, and a deep catalog of both ultralight and comfort-focused gear. Great for trying items in person or ordering online.
- Backcountry – Massive online selection with high-end and ultralight brands, detailed customer reviews, and regular sales on premium gear.
- Garage Grown Gear – Specializes in small, ultralight cottage brands you won’t find elsewhere. Ideal for thru-hikers and minimalist gear seekers.
- Moosejaw – Known for its playful brand voice and frequent deals, Moosejaw carries both mainstream and niche gear, often with price matching.
- Mountain Laurel Designs – Boutique ultralight gear maker known for precision-built shelters, backpacks, and accessories. Great for experienced minimalist hikers.
- Gossamer Gear – Highly respected ultralight gear brand offering thoughtfully designed packs, poles, and accessories optimized for long-distance hiking.
- Zpacks – One of the leading names in ultralight shelters, quilts, and backpacks. Popular among PCT and LCT hikers for shaving weight without sacrificing performance.
- Hyperlite Mountain Gear – Premium Dyneema gear that’s built to endure extreme conditions while remaining ultralight. Pricey, but bombproof.
- Enlightened Equipment – Known for customizable quilts and ultralight apparel with great warmth-to-weight ratios.
Go Back to the Table of Contents Links Page.
The Living Coast: A Guide to Wildlife Encounters & Ecosystems
The Lost Coast is a sanctuary where diverse ecosystems collide. As a visitor, you have the privilege of seeing animals in their natural, wild habitat. This guide will help you appreciate the fauna you may encounter while understanding how to stay safe.
On the Land: Mammals and Reptiles
- Black Bears: Seeing a bear from a distance is a memorable part of the Lost Coast experience. They are generally wary of humans, and their presence is a sign of a healthy ecosystem.
– Prevention: A hard-sided bear canister is required by law. This is the most critical rule. All food, trash, and scented items must be stored inside, 100 feet from your tent at night. This protects you and prevents bears from becoming dangerously accustomed to human food.
– Encounters: Make noise as you hike. If you see a bear, stand your ground, look big, speak in a loud, calm voice, and back away slowly only when it is safe. Do not run. - Roosevelt Elk: These majestic animals, which can weigh over 1,000 pounds, are a common sight.
– Prevention: Always observe elk from a great distance (at least 75 feet). Never get between a bull and his harem (in the fall) or a cow and her calf (in the spring).
– Encounters: If an elk is on the trail, do not approach. Back away and wait for it to move, or find a wide route around it. If it acts aggressively or charges, seek immediate cover behind a large tree or rock. - Northern Pacific Rattlesnake: This is the only venomous snake on the trail. They play a key role in the ecosystem and will not bite unless threatened or surprised.
– Prevention: Be mindful when stepping over logs or sitting down for a break. They often shelter in driftwood piles or sun themselves on rocky outcrops. Always look before you place your hands or feet.
– Encounters & Bites: If you see one, freeze, locate it, and then slowly back away. In the extremely rare event of a bite, stay calm, keep the wound below heart level, and use your emergency beacon immediately. The priority is professional medical care for antivenom.
In the Ocean: A Parade of Marine Life
The cold, nutrient-rich waters of the Pacific support a vibrant marine ecosystem.
- Marine Mammals: Beyond the boisterous Steller sea lions at Sea Lion Gulch, keep an eye on the waves. You can often spot harbor seals, porpoises, and, during their migration seasons (December-March), the spouts of California gray whales. While a beautiful sight, remember that sea lions and seals are powerful wild animals. Maintain a respectful distance (at least 50-100 yards) and never block their path to the ocean.
– Tide Pool Treasures: At low tide, the rocky shoreline reveals a hidden world. Look for colorful starfish (sea stars), giant green anemones, purple sea urchins, and crabs in the pools. Remember to observe without disturbing these delicate creatures. - In the Air: The Birds of the Coast
The coastal bluffs and offshore sea stacks are critical habitats for a variety of seabirds.- Seabirds: Look for gulls, terns, and pelagic cormorants cruising over the kelp beds. You may also spot common murres and pigeon guillemots on the offshore rocks. In spring and fall, shorebirds like phalaropes and turnstones can be seen foraging on Black Sands Beach.
- Birds of Prey: The skies above are often patrolled by bald eagles and ospreys, which hunt for fish in the surf.
- Coastal Flora & Tiny Threats
The plant life here is tough, adapted to salt spray, high winds, and a challenging environment. - Coastal Prairie & Wildflowers: The grassy marine terraces are a unique coastal prairie ecosystem dominated by native bunchgrasses. In the spring, they can be dotted with wildflowers like the purple silver bush lupine, tiny blue forget-me-nots, and the tough, bright pink sea thrift.
- Ticks: One of the most realistic dangers comes from the tiny Western black-legged tick, which can transmit Lyme disease.
- Prevention: Wear long pants and consider treating your clothing with permethrin. Most importantly, conduct a thorough body check for ticks every single night in your tent. Check your hairline, behind your ears, and other warm areas.
- Removal: If you find a tick, use fine-tipped tweezers to grasp it as close to the skin’s surface as possible. Pull upward with steady, even pressure. After removing the tick, thoroughly clean the bite area and your hands with rubbing alcohol or soap and water. If you develop a rash or flu-like symptoms after your hike, see a doctor immediately.
- Poison Oak: Be aware that poison oak is common, especially in the brushy areas near creeks and on the bluffs. Learning to identify its “leaves of three” is a critical skill for any Lost Coast hiker.
- After Contact: The plant’s rash-causing oil, urushiol, can take 15-30 minutes to bind to the skin. If you think you’ve brushed against poison oak, wash the affected area as soon as possible. You could use a strong, oil-cutting soap like Dawn dish soap (carried in a small, 3-ounce travel container) or a specialized product like Tecnu. Be sure to wash your hands carefully as well. The oil can also linger on clothing and gear, so wash anything that may have touched the plant when you get home. Even after the hike when a rash appears, washing with Dawn or Technu will reduce the itch and spread.

Dawn Dish Soap
- How it works: Contains powerful degreasing agents that strip the plant oils away. Original blue Dawn is the gold standard.
- Best used for: Immediate, standard washing after a hike or yard work.
- Cost: Very affordable and almost always in your pantry ($2–$3 a bottle).
- Pros: Readily available, cheap, and easily washes away oil.
- Cons: It doesn’t actively deactivate the oil, meaning if you don’t scrub rigorously, some residual oil may be left behind.
Tecnu Outdoor Skin Cleanser
- How it works: A specialty solvent/cleanser engineered to dissolve urushiol.
- Best used for: Post-exposure cleanup, or for removing the oil from contaminated clothing, gear, and pet fur.
- Cost: More expensive than dish soap (around $10–$15 per bottle).
- Pros: Can be used without water; research shows it is slightly more effective than soap at lifting the oil from pores.
- Cons: Needs to be purchased specifically for this purpose and carries a higher price tag.\
Note: Use in Nature Considerations
When used directly in nature, both Dawn dish soap and Tecnu have a negative environmental impact and violate standard outdoor ethics. Despite Dawn’s famous marketing campaigns featuring oil-spill wildlife rescue, neither product is intended for raw outdoor use. If you wash urushiol oil off in a natural stream, lake, or directly onto the ground, you pose a direct threat to the local ecosystem.
Capturing the Coast: A Photographer’s Guide
The Lost Coast is a photographer’s dream, offering dramatic landscapes and moody light. Here are a few tips to help you get the perfect shot:
- Golden Hour is Magic: The hour after sunrise and before sunset provides the best light. The low, warm sun illuminates the cliffs, creates long shadows on the sand, and paints the sky with color.
- Embrace the Fog: Don’t be discouraged by fog! It adds a sense of mystery and drama to your photos. Use it to create moody, atmospheric shots of sea stacks or the trail disappearing into the mist.
- Focus on Details: While the grand landscapes are stunning, don’t forget the small details. Focus on the textures of driftwood, the patterns in the sand left by the receding tide, or the vibrant colors of a starfish in a tide pool.
- Night Sky Wonders: On a clear, moonless night, the stargazing is unparalleled. Bring a tripod to capture long-exposure shots of the Milky Way arching over the ocean—a truly unforgettable image.
Go Back to the Table of Contents Links Page.
Things to Bring If You’re Taking a Dog

Bringing your dog on the Lost Coast Trail can be an unforgettable experience — but it requires extra preparation for their safety, comfort, and compliance with trail guidelines.
Here’s what to pack:
- Leash and Harness – Required on most trail sections. A front-clip harness can help control pulling and support your dog on rough terrain.
- Collapsible Bowl + Water – Dogs dehydrate quickly on coastal sand. Carry enough water for both of you (minimum 3–4L total).
- Dog Food in Sealed Bags – Store food in your bear canister. Avoid leaving it out at night to reduce wildlife attraction.
- Dog Booties (Optional) – Black sand and rough gravel can tear paw pads. Booties or paw wax offer protection.
- Dog Sleeping Pad or Blanket – Insulation matters, even for furry friends. Pack a lightweight pad or old foam mat.
- Dog Towel – For drying after creek crossings or rinsing sand and salt off at camp.
- Waste Bags or Trowel – You must bury waste at least 200 feet from water, or pack it out. Don’t leave dog waste behind — it’s not “natural.”
- ID Tags & Microchip Info – Remote areas mean limited rescue access. Make sure your dog’s collar has up-to-date contact info.
- First Aid Add-Ons – Include tweezers (for ticks), styptic powder (for minor bleeding), and vet-approved meds if applicable.
🐶 Note: Some dogs love the trail but not the ocean — keep them leashed near cliffs or tidepools.
Go Back to the Table of Contents Links Page.
Essential Local Knowledge: Water Sources and Trail Ethics
The wild character of the Lost Coast is its main draw, but it also requires a deeper level of preparation. Beyond tides and gear, understanding the landscape’s resources and how to protect them is key to a successful and responsible hike.
Go Back to the Table of Contents Links Page.
Your Shelter Cove Base Camp: Prepare and Recover in Comfort

Finishing the Lost Coast Trail is an unforgettable achievement. After days of navigating rugged terrain and wild coastline, the final steps onto Black Sands Beach mark a return to civilization. Fortunately, that civilization is Shelter Cove—a welcoming community perfectly suited to be your pre-hike launchpad and post-hike haven. Shelter Cove isn’t just the end of the trail—it’s also your base camp for Lost Coast adventures, gear checks, and recovery before or after tackling this iconic wilderness route.
Shelter Cove isn’t just where the Lost Coast Trail ends—it’s where something begins. For many, it’s the first quiet breath after a long drive through towering redwoods. For others, it’s the last slice of pizza, sunset beer, or foggy morning coffee before stepping off-grid.
This village of fewer than 1,000 people hugs a wild shoreline that remains blissfully uncommercialized. But what it lacks in crowds, it makes up for in character. Local businesses—from quirky inns and crab shacks to surf shops and general stores—form the backbone of a place that’s humble, human, and still deeply connected to the tides.
Whether you’re stopping through, staying a while, or imagining a life beyond the city, Shelter Cove invites you to slow down and look around. The stars are real out here. And so is the possibility.
Prepare for the Trail: Start Strong in Shelter Cove
Shelter Cove isn’t just a picturesque endpoint — it’s also the perfect launchpad for your Lost Coast Trail adventure. If you’re planning a shuttle or early-morning start at the Mattole River Trailhead, spending the night in Shelter Cove offers practical and restorative advantages.
Rest and Eat Well Before the Challenge

A good night’s sleep is one of the best ways to set yourself up for success on a demanding hike. Local lodging options offer peaceful, ocean-view stays where you can pack your gear, review your tide charts, and wake up fully refreshed. See Where to Stay
Fuel Up and Connect with Fellow Hikers
Whether you’re looking for a hearty dinner, craft beer, or an ocean-view coffee in the morning, Shelter Cove’s cafés, restaurants, and brewpubs offer satisfying meals before you hit the trail. It’s also a great place to chat with fellow hikers or locals who know the trail well. See Places to Eat.
Enjoy the Calm Before the Wild
There’s something grounding about watching the sun set over the Pacific the night before venturing into one of the most remote stretches of coastline in the country. Starting your journey in Shelter Cove means you’re not rushing — you’re arriving with intention.
Post-Hike Rewards: From the Trail to Town

The most popular way to hike the Lost Coast is from north to south, and for good reason. This route means you end your journey by walking directly into the comfort and convenience of Shelter Cove. Imagine the feeling of taking off your pack at the Black Sands Beach Trailhead and knowing that immediate rewards are just moments away. See Places to Eat.
Surf Point Coffee & Bistro: Where the Trail Meets the Perfect Cup

Tucked into the heart of Shelter Cove, Surf Point Coffee & Bistro is more than just a coffee stop—it’s a ritual for hikers, locals, and travelers alike. Whether you’re fueling up before tackling the Lost Coast Trail or unwinding after an unforgettable trek, there’s no better place to sip, savor, and settle into the rhythm of this coastal paradise.
The aroma of fresh espresso draws you in. Inside, you’ll find expertly crafted lattes, mochas, and cappuccinos, alongside a rotating menu of hearty breakfast options, pastries, and snacks that hit just right. The staff here are as warm as the drinks they serve—genuinely friendly, attentive, and eager to hear your hiking story or share local tips.
Grab a seat at one of the outdoor tables, and you’ll be treated to sweeping ocean views and the occasional flyover from the nearby airstrip—a reminder of just how remote and remarkable this place truly is. On misty mornings or golden afternoons, the ambience at Surf Point is quietly electric, filled with anticipation or celebration, depending on which way your boots are pointed.
Whether you’re starting your Lost Coast journey or celebrating its end, Surf Point Coffee & Bistro is the kind of place that feels like both a destination and a welcome home.
See Places to Eat for more great local favorites.
The Art of the “Beach Day”: Planning for Rest and Recovery
The Lost Coast isn’t a race. Consider building a “beach day” into your itinerary, especially if you’re planning a 4-day trip. This isn’t just about resting your legs; it’s about giving yourself time to truly connect with the landscape.
Spend the day exploring the tide pools near your camp, reading a book under a driftwood log, or simply watching the waves. One hiker in a recent trip video found their new tent’s awning feature perfect for creating a shady spot to relax and recover. Embracing a day of intentional rest can be one of the most memorable parts of your journey.
Go Back to the Table of Contents Links Page.
A Taste of the Trail: Day Hikes from Shelter Cove
Not everyone has the time for a multi-day backpacking trip, but you can still experience the magic of the Lost Coast. Others may choose to stay a while in Shelter Cove after the long hike of the Lost Coast Trail and still want to do some shorter hikes around town. Not everyone can commit to the full 3-4 day backpacking trip. For those searching for Lost Coast day hikes, short hikes from Shelter Cove, or a way to experience the trail without a permit, these out-and-back options deliver scenic rewards with less commitment.
Here are a few rewarding out-and-back day hikes starting from the Black Sands Beach Trailhead:
- The First Mile (Easy, 2 miles round-trip): Walk the iconic Black Sands Beach for a mile and back. This easy, flat walk gives you a feel for the immense scale of the coastline and is perfect for families or a short sunset stroll.
– Trailhead: Black Sands Beach parking lot
– Directions: Park at Black Sands Beach Trailhead (end of Beach Road off Shelter Cove Rd). Walk south along the shoreline 1 mile, then return. - Hike to Gitchell Creek (Moderate, ~4 miles round-trip): This hike takes you further into the wild, offering stunning views of the cliffs and sea stacks. Gitchell Creek is a beautiful spot for a picnic before turning back. Remember to check the tides, as parts of this section can be tricky at high tide.
– Trailhead: Black Sands Beach
– Directions: Begin at the Black Sands lot; hike south ~2 miles to Gitchell Creek. Picnic, then return. Check tide tables—a short cliff bypass may be needed at high tide. - Challenge to Big Flat (Strenuous, ~13 miles round-trip): For experienced and fit day hikers, the journey to Big Flat and back is a serious but rewarding challenge. This full-day adventure takes you through the most rugged and beautiful part of the southern trail. You must start early and plan your hike around low tide.
– Trailhead: Black Sands Beach
– Directions: Early start from Black Sands Beach; hike south through tide-locked zones, reaching Big Flat for lunch or rest before returning. Plan for low tide windows. - Hidden Valley Loop (Easy–Moderate, ~3 miles round-trip)
A peaceful forest-meadow loop tucked just above Shelter Cove. Enjoy a quiet walk through coastal woodlands, occasional ocean views, and a gentle trail great for families or a relaxed morning stretch.
– Trailhead: Hidden Valley Interpretive Trailhead – ¼ mile up Chemise Mountain Rd off Shelter Cove Rd.
– Directions: Take Shelter Cove Rd → Chemise Mountain Rd → trailhead; 1-hour interpretive loop through coastal forests and meadows with ocean views.**Punta Gorda Lighthouse Out‑and‑Back (Moderate, ~6 mi)**
– Trailhead: Mattole side via shuttle or long drive; or mid-trail starting near Sea Lion Gulch.
– Directions: Shuttle or drive to Mattole Beach, hike south ~4 miles across low tide beach to - Punta Gorda Lighthouse, then return. Plan tide carefully.
Follow remote beach to one of California’s most isolated lighthouses. The route is tide-dependent and incredibly scenic, offering sea lion sightings and a real sense of the trail’s rugged beauty.
– Trailhead: Black Sands Beach
– Directions: Head south past Punta Gorda to Sea Lion Gulch (~3–3.5 mi). Hike the beach and cliff trail loop before returning the same way. - Sea Lion Gulch Stretch (Moderate–Strenuous, ~7 miles round-trip)
This bluff-meets-beach route takes you through tide-carved coves, past driftwood stacks and marine reserve habitats, ending at a coastal canyon rich with wildlife and ocean spray.
– Trailhead: Black Sands Beach
– Directions: Head south past Punta Gorda to Sea Lion Gulch (~3–3.5 mi). Hike the beach and cliff trail loop before returning the same way.
Go Back to the Table of Contents Links Page.
Lost Coast Trail: Frequently Asked Questions (FAQs)
Are fires allowed on the trail?
No. Fires are prohibited. Only backpacking stoves are permitted for cooking.
When to Go: Choosing Your Season on the Lost Coast
The Lost Coast Trail offers a unique experience in every season, but conditions can vary dramatically. Choosing when to go depends on your tolerance for rain, fog, and crowds. While permits are required for overnight trips year-round, the trail’s character changes significantly from spring to winter.
Spring (March – May)
Spring on the Lost Coast is a time of transition and rebirth.
- Pros: The landscape is often green and lush, with the potential for spectacular wildflower displays. Water sources are generally reliable, and you’ll encounter fewer people than in the peak summer months.
- Cons: The weather can be unpredictable. Rain is still a major concern, particularly from the winter carryover into March and April. Creek crossings can be high and challenging after heavy rains.
Summer (June – August)
This is the most popular and busiest season on the trail, offering the warmest and longest days of the year.
For those searching best time to hike the Lost Coast Trail, the answer depends on your preference for solitude, scenery, and safety. Spring and Fall offer fewer crowds and vibrant ecosystems, while Summer offers longer days and drier tides — ideal for most first-time hikers.
- Pros: You have the best chance for warmer, drier weather. Long daylight hours provide ample time for hiking between tides.
- Cons: Coastal fog is common year-round but can be especially persistent on summer mornings. Permits can be difficult to secure due to high demand. Despite the season, sun exposure is constant on the shadeless beach sections, and overnight lows can still dip below freezing.
Fall (September – October)
Many experienced hikers consider autumn the best time to visit the Lost Coast.
- Pros: This season often brings the clearest skies and most stable weather, with less fog than in summer. The trail is significantly less crowded, and the milder temperatures can be perfect for hiking.
- Cons: Some smaller water sources may be dry, potentially requiring longer water carries between reliable creeks. The rainy season can begin as early as late October, so be sure to check forecasts.
Winter (November – February)
Hiking the Lost Coast in winter is a serious undertaking recommended only for experienced, well-equipped backpackers prepared for challenging conditions.
- Pros: You will experience a level of solitude that is unimaginable during the rest of the year. The coast is at its most raw and dramatic.
- Cons: This season presents the most significant hazards. Rain and high creek crossings are major concerns. Intense northwest winds of 10-30 mph can feel relentless. Short daylight hours limit your hiking window, which is a critical factor when planning around the tides.
Do I need a GPS to hike the Lost Coast Trail? Not strictly—but it’s highly recommended. While the trail follows the coastline, fog, tide timing, and unmarked beach stretches can disorient even experienced hikers. Download offline maps via a navigation app with GPX and keep your phone in airplane mode to conserve the battery. Always bring a paper map and compass as a critical backup.
How difficult is the hike? What kind of fitness is required? The hike is physically demanding. The main challenges are not from elevation gain but from walking long distances on soft sand and uneven, rocky beaches, which saps energy quickly. Hikers should be in good physical condition, comfortable carrying a 30-40 lb pack for 6-12 miles a day, and prepared for challenging terrain.
Are trail runners or boots better for the Lost Coast? Both are common choices, and each has pros and cons. Trail runners are lightweight and dry quickly, while waterproof boots offer better ankle support and protection on the wet, rocky sections. Either way, expect wet feet and carry at least 2-3 pairs of wool or synthetic socks.
What are the creek crossings like? Most creeks can be crossed near the ocean during low tide without issue. However, after heavy rain (especially from November to April), creek crossings are a major concern and can become dangerous. It’s wise to bring camp shoes or sandals for crossings to keep your primary footwear drier. Never attempt to cross a dangerously swollen creek; wait for the water to recede.
What about bears, rattlesnakes, and ticks?
- Bears: Black bears are present. Bear canisters are required year-round for all food and scented items to protect both you and the bears.
- Rattlesnakes: While not common on the beach itself, they can be found in the grassy terraces and driftwood piles. Be mindful of where you sit and place your hands.
- Ticks: Ticks are present in the grassy areas, especially near Sea Lion Gulch and Big Flat. Do a thorough tick check at the end of each day and consider including tweezers in your first-aid kit.
Is there Poison Oak on or Along the Lost Coast Trail?
Yes—poison oak is common throughout the leafier, inland sections near creeks and bluff transitions on the Lost Coast Trail. Hikers and trail reports note thigh-high patches in some areas and recommend caution.
How to stay safe:
- “Leaves of three, leave them be“ — consistently referenced by hikers and shuttle services.
- Wear long sleeves and pants — to reduce skin exposure (especially recommended in poison oak–dense areas near Sea Lion Gulch or Big Flat).
- Clean up quickly — if you brush against it, use Tecnu or dish soap at water sources and change clothes before sleeping. I personally have found Dawn dishwasing liquid to be the best bang for the buck.
- Wash gear and pets — urushiol (the oil) can linger on clothing, gear, or even pets and cause delayed reactions.
Is it safe to hike the Lost Coast Trail alone? This depends entirely on your experience, preparedness, and comfort level with solitude. Many people do hike it solo. If you choose to, you must be completely self-sufficient, confident in your navigation skills, and have a reliable way to signal for help in an emergency, such as a satellite messenger or personal locator beacon.
Where can I get a meal or take a shower after I finish? If you hike the popular north-to-south route, you will finish at Black Sands Beach in Shelter Cove. The town offers several local restaurants for a well-deserved post-hike meal and various lodging options where you can get a hot shower and a comfortable bed to recover from your trek.
Can I hike the Lost Coast Trail in winter or early spring?
Yes — but you should proceed with caution. The weather off-season (November–April) brings colder temperatures, frequent rain, and increased risk of stream flooding and impassable sections. Stick to May–October for safer and more predictable trail conditions.
How do I plan around tide-locked zones?
There are three major tide-locked zones where the trail becomes completely impassable at high tide blm.gov+1snewman-228.medium.com+1. Hikers should aim for tide levels under 3 ft (around Punta Gorda) or 2.5‑3 ft in longer sections. Start those segments on a receding tide and aim to be well out before tide rises.
When should I grab the shuttle vs. key‑swap or drive‑in?
Some hikers choose a south-to-north (SOBO) route — dropping a car at Black Sands Beach and catching a shuttle to Mattole en.wikipedia.org+11outdoorstatus.com+11lilymtang.com+11. Alternatives include:
- Key-swap — coordinate with another hiker
- Self-shuttle — park two vehicles (though parking roads can be rough)
A shuttle offers convenience but costs around $85–95 per person.
Is a permit required for day hikes or partial sections?
Yes. Any overnight on the Lost Coast Trail requires a Backcountry Permit via Recreation.gov ($6 per person), with a daily quota of 60 in peak months. Day hikes typically do not require the overnight permit, but check local closures before planning.
Do I need to worry about tides at campsites?
Yes. Some campsites (e.g., Sea Lion Gulch, Big Flat) are within tide zones but are sited above low tide lines. Even so, ensure you reach them at low tide and exit before the tide returns. Late neglection can strand you or flood your tent.
How early should I start each day?
Because key tide zones must be crossed within daylight and low tide windows, most hikers begin early (before 7 AM) to ensure ample time. Shortening days later in the season or fog can affect timing—avoid crossing after 4 PM when visibility worsens
Are there potable water sources along the trail?
Yes — all creek crossings along the beach offer fresh water that must be filtered or treated. During long dry stretches, it’s wise to carry 3–4 L between filter points.
Is there cell service on the Lost Coast Trail?
No — Cell coverage is virtually nonexistent on most of the trail. Your only options are offline navigation tools, satellite devices, or a Personal Locator Beacon for emergencies. Don’t depend on your phone.
Am I allowed to fish along the Lost Coast Trail?
Yes — 🎣 fishing is permitted along much of the Lost Coast Trail, but there are important restrictions you need to follow:
- A valid California fishing license is required, even for shoreline fishing. Carry it with you.
- Ocean fishing (surfcasting) is allowed in most areas and can yield surfperch, rockfish, and greenling — but conditions are rugged, and waves can be dangerous. Cast only when safe and never turn your back on the ocean.
- No fishing is allowed in certain freshwater streams and creeks, particularly where they are designated for protected salmon or steelhead spawning. These waters may have seasonal or permanent closures.
- Check California Department of Fish and Wildlife (CDFW) regulations for Humboldt and Mendocino Counties, including marine protected areas (MPAs) along the Lost Coast.
- If you catch fish: all food must still go in your bear canister overnight, and you must follow Leave No Trace practices for cleaning and disposal.
📎 California Fishing Regulations – North Coast Region
📎 Check Licenses or Purchase One Online
See Also
Internal Resources
- My Lost Coast Trail Videos YouTube PlayLists – a collection of YouTube Videos hikers have made about hiking the Lost Coast Trail and related topics from my @Shelter-Cove YouTube Channel
– King Peak & Lost Coast – Hiking
– Lost Coast – Camper / Sprinter Van
– Full set of Playlists for my @Shelter-Cove YouTube Channel - Beaches of the Lost Coast – A guide to Shelter Cove’s nearby beaches: Cove Beach, Black Sands, tidepool access, and sunset spots
- How to Get to Shelter Cove – Tips for driving, flying, and navigating rural roads to reach the trailhead
- Why Visit Shelter Cove – A broader introduction to the region’s nature, pace, and hidden coastal charm
- My Video Playlist of Videos on Hiking the Lost Coast Trail as part of YouTube.com/@Shelter-Cove
Official & Planning Resources
- BLM Lost Coast Trail Page – Permits, regulations, closures, and links to official maps
- BLM Trail Map PDF – Printable and zoomable map showing elevation, campsites, and tide zones
- King Range NCA Map Kiosk alt – The entire Lost. Coast Trail can be impassable at any time. Streams become deep and swift dunng/after heavy ram. Always use common sense.
- NOAA Tide Tables – Shelter Cove Station – Accurate tide info with downloadable charts for offline use
- Caltopo Lost Coast Viewer – Interactive map for trip planning, elevation, and GPX downloads
- Recreation.gov Permit Page – Where to book your trail permit online for the Lost Coast
Maps, GPX Files, and Trail Resources
- BLM Official Trail Map (PDF) – The authoritative printable trail map with tide zones, campsites, mile markers, and topography
- Caltopo: Lost Coast Trail Custom Planner – Interactive tool to build custom routes, export GPX, and overlay slope/tide risk
- Gaia GPS: Lost Coast Route – GPX download with elevation, terrain layers, and offline map options for phones and watches
- AllTrails: Mattole to Black Sands Route – Popular community-sourced route with GPX, photos, and recent trip reports
- Trailspotting GPX Library – Downloadable Lost Coast Trail GPX files for various segments, with customizable pace profiles
- Lost Coast Trail – GPSFileDepot (Topo Overlay) – Custom topo maps that integrate with Garmin devices and BaseCamp
- Tide Chart Annotation Tools – Use Caltopo or Gaia to mark tide-locked zones and annotate low tide windows per day
Go Back to the Table of Contents Links Page.
Local Transportation and Shuttles

- Lost Coast Adventures Shuttle – Local, trail-knowledgeable shuttle for hikers going north-to-south; pickups in Shelter Cove with drop-offs at Mattole
- Redwoods Shuttle (Seasonal) – Operates seasonally for north-to-south hikers; availability varies, so check forums and signage in Shelter Cove
- Lost Coast Trail Facebook Group – Used by hikers planning DIY car swaps or south-to-north logistics; also has real-time shuttle updates
- DIY Car Shuttle Tips – SoCalHiker – Advice for hikers going either direction, including staging cars at both trailheads or coordinating with another group
Go Back to the Table of Contents Links Page.
12 Other Guides (“The Dirty Dozen”)
- AllTrails: Lost Coast Trail (Mattole to Black Sands) – Overview, GPX download, elevation, and verified hiker reviews
- The Trek: Lost Coast Trail Guide – Strong balance of detail, photos, safety notes, and personal insights
- Outdoor Project: Lost Coast Trail – Trail breakdown, maps, highlights, and camping beta
- Bearfoot Theory: Lost Coast Backpacking Guide – Excellent tide tips, sample itineraries, and gear suggestions
- Modern Hiker: Lost Coast Trail Description – Vivid writing with solid logistics and terrain warnings
- Backpacking Light Forum Threads – Tips from ultralight hikers, water source reports, weather trends
- HikeSpeak: Lost Coast Trail Itinerary and Tips – Clear day-by-day breakdowns and visuals
- YouTube – Halfway Anywhere’s LCT Vlog – A realistic look at terrain, pace, and daily experience
- SoCal Hiker – Lost Coast Adventure Journal – Personal trip log + suggested pre/post travel stays
- California Through My Lens – LCT photos, detour ideas, side hikes, and drone shots
- Gaia GPS Trail Page – GPX-ready map with overlays for weather, terrain, and tide-locked zones
- Reddit: r/WildernessBackpacking Lost Coast Thread – Real hiker Q&A, recent conditions, shuttle coordination
Go Back to the Table of Contents Links Page.
